This comprehensive gorilla trekking photography guide will help you prepare for the unique challenges of Bwindi’s dark canopy, fast-changing light, and strict no-flash rules. If you don’t know how to push your ISO or handle the humidity, you’ll leave with a gallery of blurry, green-tinted shadows.
That’s the real challenge of gorilla photography. You are working in low light, on uneven ground, under a wet forest canopy, with only a short viewing window and no chance to ask the subject to pause. No flash. No tripods. No moving closer.
If you’re worried about fogged-up glass, missed focus, or carrying a heavy lens up a steep trail for “just one hour” with the gorillas, don’t worry. We’ve been there. At Orugano Safaris, we’ve guided hundreds of photographers through these mountains, and we know what actually works in the field. That means practical advice on dealing with moisture on the lens, knowing why a 70-200mm f/2.8 is your best friend even if it feels heavy on the hike, and understanding how our guides will physically move you into a better position when the light angle gives you a stronger shot. Whether you’re using a smartphone, a crop-sensor camera, or a full-frame setup, this guide helps you come back with sharp, usable images instead of frustration.
Table of Contents
- Why Gorilla Photography is Unique
- The “Golden Kit”: Essential Gear
- Mastering the Settings: No-Flash Baseline
- Gorilla Photography with a Smartphone
- Composition Tips: How to Tell a Story
- The Orugano Advantage: How Our Guides Help
- Field Tips: Rain, Humidity, and Stealth
- 7 Common Gorilla Photography Mistakes
- Gorilla Photography Comparison Table
- Frequently Asked Questions
Why is Gorilla Photography So Challenging in This Gorilla Trekking Photography Guide?
Photographing mountain gorillas is unlike an open-savanna safari in the Serengeti. In the rainforest, you are dealing with three major variables, and any solid gorilla trekking photography guide needs to address them directly:
- Low Light: The “Impenetrable” forest is named that for a reason. Even at midday, the canopy can block out 80% of the light.
- The No-Flash Rule: This is non-negotiable. Flash can blind or agitate the gorillas, leading to a dangerous charge or simply ruining their natural behavior.
- The Distance: You must maintain a 7-meter (about 23 feet) distance under Uganda Wildlife Authority (UWA) rules. While gorillas sometimes break this rule by approaching you, you cannot move toward them to get a better angle.
With only 60 minutes allowed with the gorillas (or 4 hours if you book a Gorilla Habituation Experience), every second counts.

What Should You Pack in Your Camera Bag?
The “perfect” lens depends on your style, but if you ask us, there is one clear winner.
The Must-Have Lens: 70-200mm f/2.8
If you can only bring one lens, make it this one. The 70-200mm range allows you to capture tight portraits of a Silverback’s face while also zooming out for family group shots. The f/2.8 aperture is critical, it lets in significantly more light than cheaper f/4 or f/5.6 lenses, which is the difference between a sharp photo and a blurry mess. If you want to compare field-tested options and camera body performance, resources like DPReview can help you narrow down your setup before travel.
The Secondary Lens: 24-70mm f/2.8
Sometimes a juvenile gorilla will decide to climb a branch right above your head. In those moments, a telephoto lens is too “tight.” A wider 24-70mm lens allows you to capture environmental portraits, showing the gorilla within the lush Bwindi greenery.
What to Leave at Home:
- Tripods: They are cumbersome, slow to set up, and often not allowed on the narrow, muddy trails.
- Large 600mm Primes: Unless you are birding, these are too heavy and the focal length is usually too long for the 7-meter rule.

The Technical Blueprint: Mastering Your Settings
Don’t wait until you see the gorilla to figure out your settings. The forest is dark, and your camera will struggle if left on “Auto.” For extra practice on exposure and autofocus basics before your trip, Digital Photography School has useful tutorials. Here is what we recommend as your starting baseline:
| Setting | Recommended Value | Why? |
|---|---|---|
| Exposure Mode | Aperture Priority (A/Av) | You control the light; the camera handles the rest. |
| Aperture | f/2.8 to f/4 | Opens the “eye” of the lens wide to let in light. |
| ISO | 1600 to 6400 | Don’t be afraid of “noise.” A sharp, grainy photo is better than a clean, blurry one. |
| Shutter Speed | Min 1/250s | Gorillas move faster than they look, especially the infants! |
| Focus Mode | Continuous AF (AF-C or AI Servo) | To track the gorilla as it moves through the brush. |
| Drive Mode | Low-Speed Burst | To capture the perfect expression without filling your card too fast. |
Pro Tip: Use Silent Shutter mode if your camera has it. The “machine-gun” sound of a mechanical shutter can be distracting in the quiet of the forest.
Gorilla Photography with a Smartphone
Can I take gorilla photos with my phone? Yes. Most of our guests use smartphones and still come back with great, memorable photos. Phones are easier to carry, easier to protect from rain, and much faster for sharing with friends and family after the trek.
That said, you should keep your expectations realistic. Smartphones are excellent for memories, quick sharing, and casual shooting, but professional cameras still deliver much better image quality in Bwindi’s dark forest. Many visitors combine gorilla trekking with landscape photography. Guests staying in Nkuringo often spend their mornings and evenings photographing the Virunga Volcanoes from lodge viewpoints and community trails. While smartphones perform well in bright conditions, photographers quickly notice the advantage of larger camera sensors when capturing sunrise light, distant volcanoes, misty forest ridges, and low-light conditions beneath the Bwindi canopy.

If you plan to use your phone, these are the field tips that matter most:
- Use the main lens, not digital zoom. Digital zoom usually makes the image soft fast.
- Tap the gorilla’s eye for focus. If the eye is sharp, the photo usually works.
- Hold the phone with both hands for stability. The forest is dark, and camera shake ruins more phone shots than people expect.
- Use burst mode for movement. This helps when juveniles shift position or a silverback turns his head.
- Clean condensation from the lens regularly. Bwindi is humid, and a fogged phone lens can make every photo look dull.
- Avoid switching repeatedly between photo and video. Pick a strategy before the hour starts so you do not miss key moments while changing modes.
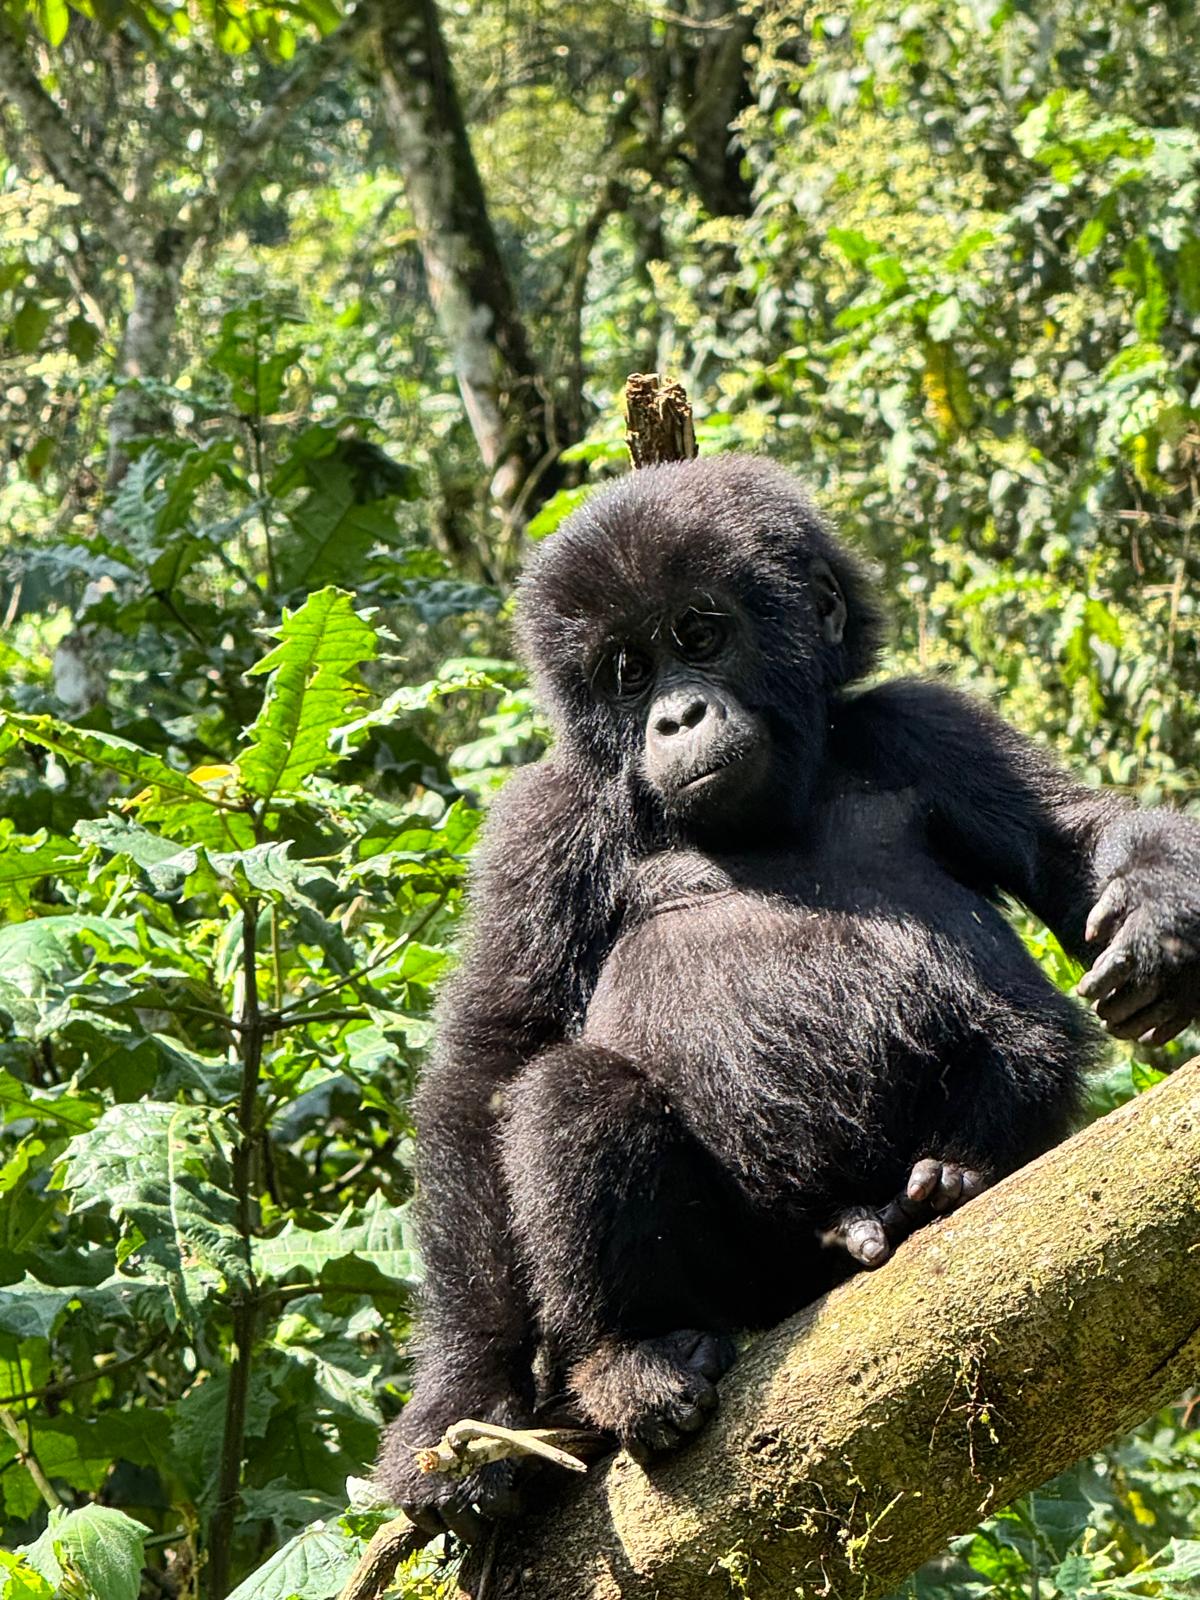
How Do You Take More Than Just a “Portrait”?
Anyone can take a photo of a gorilla sitting down. To create a “wow” image, you need to think about the story.
- Get at Eye Level: Don’t just shoot from a standing position. If your guide says it’s safe, crouch down. Shooting at eye level creates an emotional connection that “looking down” on the animal lacks.
- Focus on the Eyes: The eyes are the windows to the soul. Ensure your focus point is locked onto the eye closest to the camera.
- Frame with Foliage: Use the leaves and vines. A gorilla peeking through a gap in the ferns often looks more “wild” and authentic than one in a clear patch.
- Capture the Hands: Gorilla hands are remarkably human. A close-up of a Silverback’s hand resting on a branch can be just as powerful as a full portrait.
The Orugano Advantage: How Our Guides Help
Our guides know the habits of the gorilla families in Nkuringo and Rushaga well, and that local knowledge helps you get better viewing angles without pushing the moment or disturbing the group.
On trek, they work hard to help you make the most of your hour:
- Position you safely: They help you stand where you have the clearest possible view while respecting the rules and the gorillas’ space.
- Read the family’s movement: They often know when a silverback is likely to shift position or when another family member is about to step into a better opening.
- Improve your line of sight: Where appropriate and within park guidance, vegetation may be cut back to open a cleaner viewing gap.
- Keep the encounter calm: You will sometimes hear the rangers and guides “talking” to the gorillas in the vocal language they have learned over years in the field, which helps keep the interaction steady and calm.
During gorilla encounters, seeing the silverback is extremely common. While no wildlife experience can ever be guaranteed, visitors who locate a gorilla family will almost always observe the dominant silverback as part of the group. And even when the silverback is partly hidden for a few minutes, there are usually plenty of other family members around you for strong photographic opportunities.
As owners of the Orugano Bwindi Lodge, we also give you a practical base close to the briefing point, with staff who understand early starts, wet gear, and battery charging before you head into the forest.

Field Tips: Rain, Humidity, and Stealth
The Bwindi Impenetrable Forest sees over 1,500mm of rain annually. It will be humid, and it might pour.
- Rain Protection: You don’t need a $100 professional rain cover. A simple heavy-duty plastic bag with a hole for the lens and a rubber band works wonders.
- The “Fog” Factor: When moving from a cool vehicle into the humid forest, your lens will fog up. Give it 20 minutes to acclimate before you reach the gorillas.
- Trek Difficulty: Remember, you might be hiking for 2 to 6 hours before you find them. Ensure your camera strap is comfortable. We recommend a “sling” style strap or a chest harness to take the weight off your neck.
Why Hiring a Porter is the Best Photography Upgrade
If you are carrying a camera body, a 70-200mm lens, rain protection, spare batteries, and water, a porter is not a luxury. It is one of the most practical upgrades you can make on trek.
- They help with heavy lenses and camera gear. You save energy for the gorilla encounter instead of using it up on the approach hike.
- They help protect your equipment on steep trails. Bwindi paths can be narrow, slippery, and rough underfoot, especially after rain.
- They help you through muddy sections. That matters when you are trying to stay upright without knocking a lens into wet ground.
- They support local livelihoods. Hiring a porter directly benefits families around the park and makes your trek easier at the same time.

For more on what to wear and how to prepare for the hike itself, check out our Ultimate Guide to Gorilla Trekking in Uganda.
7 Common Gorilla Photography Mistakes
- Bringing only a smartphone zoom lens. Standard lenses are usually better and more reliable in forest conditions.
- Leaving the camera on Auto. Auto mode often reacts badly to dark foliage and shifting light.
- Using shutter speeds below 1/200. Gorilla movement looks slow until you check the blur later.
- Constantly changing lenses in humid conditions. This increases the risk of moisture and dirt getting where you do not want them.
- Carrying too much equipment yourself. Hire a porter. It is the best investment for your back and your focus.
- Spending the entire hour behind the viewfinder. Take your photos, then give yourself a few minutes to simply watch.
- Forgetting spare batteries. Cold mornings, burst shooting, and video drain power fast. Though at Orugano Bwindi Lodge, we ensure your batteries are fully charged before you head into the jungle.
Beyond the Gorillas: Photographing Local Culture
Some of our guests return with just as many photographs from local communities as they do from the gorilla trek itself. Traditional craft shops, basket weaving, coffee processing, village walks, and mountain landscapes provide excellent opportunities for storytelling images that capture the wider Bwindi experience.

Gear Comparison Table
| Photographer Level | Recommended Camera | Recommended Lens | Key Accessory |
|---|---|---|---|
| The Enthusiast | iPhone 15/16 Pro or Samsung S24 Ultra | Built-in Telephoto (3x/5x) | A lightweight power bank. |
| The Hobbyist | Sony A6400 / Canon R10 (Crop Sensor) | 18-130mm or 70-300mm | Rain sleeve & microfibre cloth. |
| The Professional | Sony A7R V / Canon R5 / Nikon Z9 | 70-200mm f/2.8 & 24-70mm f/2.8 | Dual-slot memory cards (RAW). |
Frequently Asked Questions
Is gorilla trekking worth it if I only have a smartphone?
Absolutely. Modern smartphones have incredible low-light processing. While you won’t get the same background blur (bokeh) as a professional lens, you will still capture stunning, sharable memories.
Can I use a GoPro?
Yes, but only for wide-angle video. A GoPro will make a gorilla 7 meters away look like a tiny dot. It’s great for filming the “trek” experience, but poor for gorilla portraits.
How many photos should I take?
The average person takes 300-500 photos in that one hour. However, we always recommend putting the camera down for at least 10 minutes. Nothing compares to looking into a mountain gorilla’s eyes with your own two eyes rather than through a viewfinder.
What is the best sector for photography?
Many photographers enjoy the Nkuringo Sector because the higher elevations occasionally provide more open views and dramatic backgrounds toward the Virunga Volcanoes, though excellent opportunities exist across all sectors. If you stay nearby, carry binoculars as well. The views from the cottage balcony are worth your time, especially on clear mornings. In June, July, August, and September, the forest is often particularly clear for photography—especially if you stay at Orugano Bwindi Lodge.
Photography-Focused Gorilla Safaris
At Orugano Safaris we help photographers by:
- Securing permits in the most suitable sectors for your light preferences.
- Arranging porter services for heavy camera equipment.
- Planning Gorilla Habituation Experiences for 4x the photography time.
- Organising accommodation right at the briefing point for early starts.
- Building custom itineraries combining gorillas, chimpanzees, and savanna wildlife photography.

Ready to Capture Your Own Story?
Planning a photography-focused safari requires a bit more care than a standard tour. You need a team that understands light, timing, and the specific needs of a photographer. This gorilla trekking photography guide covers the basics, but your actual route, permit sector, and gear plan still matter on the ground.
Whether you want a 3-Day Short Gorilla Trek or a multi-country East Africa Wildlife Safari, we are here to help.
Contact Orugano Safaris today and let’s start planning your gorilla trekking photography guide safari in the heart of Africa.